Skyscanner Ads Manager
Campaign Creation
Creating a Campaign
Your ads on Skyscanner are organised across two tiers: campaigns and line items. One campaign can contain multiple line items and within those line items can be different targeting, tracking and creative combinations.
To create a new campaign:
-
Click Advertising > Campaigns
-
Click 'Create campaign +' in the top right
-
Enter the campaign name
- Once you've gone through the line item creation, creative and tracking implementation, you can click 'Send for Review'. From here, one of our support team will confirm the campaign is ready and put it live.
Your campaign is now ready to have its line item(s) added.
Creating a Line Item
You’ll be presented with an empty campaign, so let’s add your line items.
- Click 'Line Items +' on the left (below campaign name)
- Name your line item
- Select your product (available products and their specifications here)
- Select your start and end dates / times
- Your rate will have been agreed with your Commercial Manager at Skyscanner
- Select the relevant Markets and Locales you wish this line item to target (if left unselected all will be targeted)
- Select your Routes*, Itinerary Type, Cabin Class, Passenger Types and even apply a departure window if required
*If you wish to upload a custom route list you can export the template from within the custom routes section. In short, all you need are two columns (Origin, Destination) and then your route code pairings. Skyscanner Ad Manager will do the rest.
You're not quite finished yet, so let's move onto Tracking Implementation.
Tracking Implementation
You can track your ads as follows:
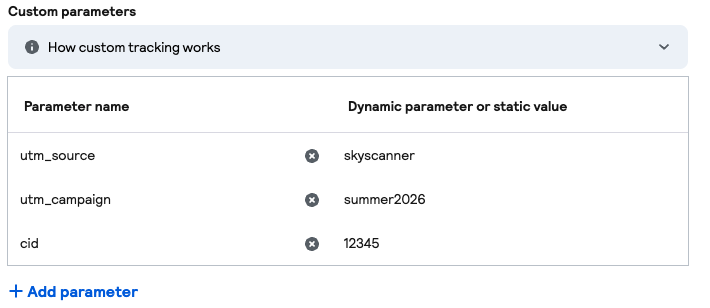
- Custom Parameters
- Third party click and impression tracking
- Combination of the above
In Skyscanner Ad Manager you can enter your custom parameters using the form below:

Third party tracking can be added using the 'Click Tracking Configuration' field. For clarity, 'Basic' is one tracker URL for that line item and all its targeting. 'Advanced' gives you the opportunity to assign specific trackers to different combinations of targeting (a specific tracker for one route, for example).
Impression pixels are also implemented using the pixel URL, less any Javascript wrapping. Macros are usually inserted automatically, but check that your timestamp is capitalised before finalising your setup.
We accept third party tracking URLs from the approved third party vendors found at the bottom of this page.
